Hello, Chameleon
In this tutorial, you will learn how to use Chameleon to run experiments in computer networks or cloud computing. It should take you about 60-90 minutes of active time to work through this tutorial.
Note This process has a “human in the loop” approval stage - you’ll need to wait for your instructor or research advisor to approve your request to join their project. Be prepared to start the tutorial, wait for this approval, and then continue.
Chameleon is a “virtual lab” for experiments on networking, cloud computing, and distributed systems. It allows experimenters to set up real (not simulated!) bare metal servers at Chameleon host sites located around the United States. Experimenters can then log in to the hosts associated with their experiment and install software, run applications, and collect measurements.
Before you can run lab experiments on Chameleon, you will need to set up an account. Once you have completed the steps on this page, you will have an account that you can use for future experiments.
Prepare your workstation
You’ll need to prepare your workstation (the laptop or PC you are going to use for your experiments) with a suitable terminal application.
Terminal software
To use Chameleon, the primary software application you’ll need is a terminal, which you will use to log in to remote hosts over SSH.
You may have a terminal application already on your workstation. If not, here are some suggestions:
- cmder for Windows. (Get the full version, not the mini version.)
- iTerm2 for Mac
- terminator for Linux
Once you have downloaded and installed your terminal application, make sure you know how to open it!
Set up your account on Chameleon
Now that you have the software you need, you are ready to set up an account on Chameleon.
Exercise: Create an account
First, go to https://chameleoncloud.org/ and click on “Log In”.
Click on the link that says “Sign up now”
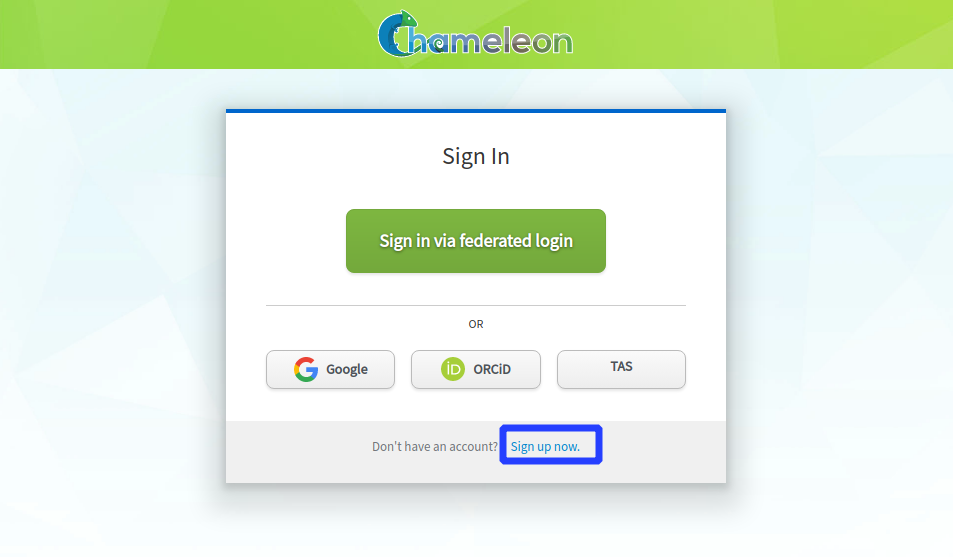
to get to the user registration page. Then, click “Sign in via federated login”.
You will want your Chameleon account to be linked to your university credentials, so select your university from the list:
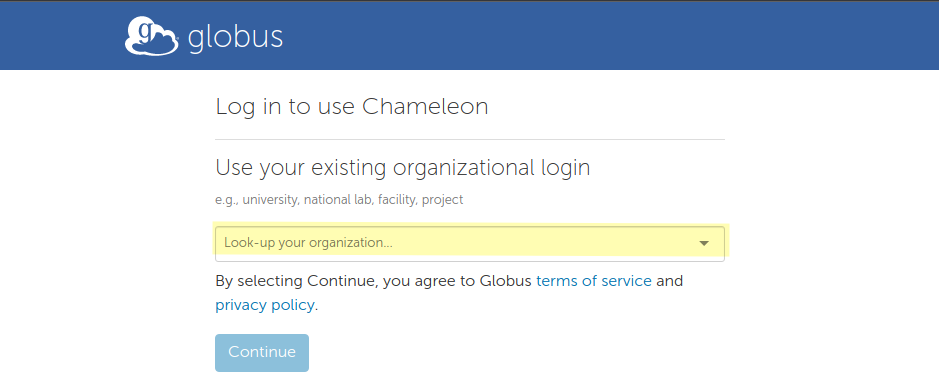
and then click Continue. Log in with your university credentials.
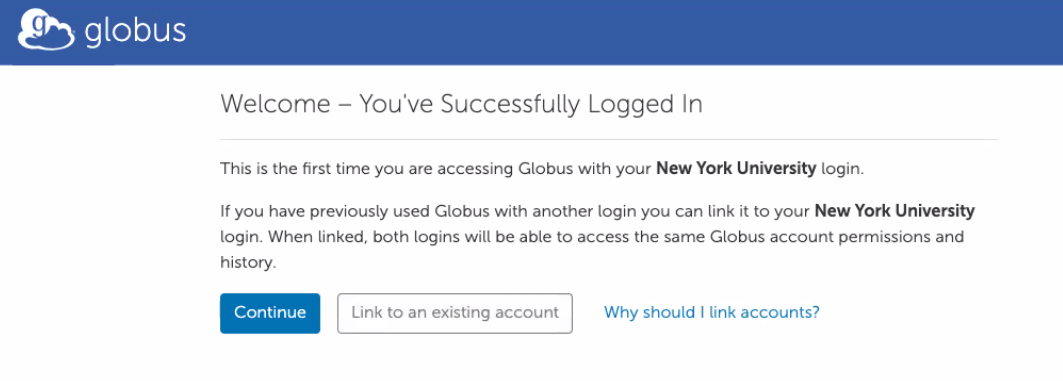
Click Continue at the next prompt:
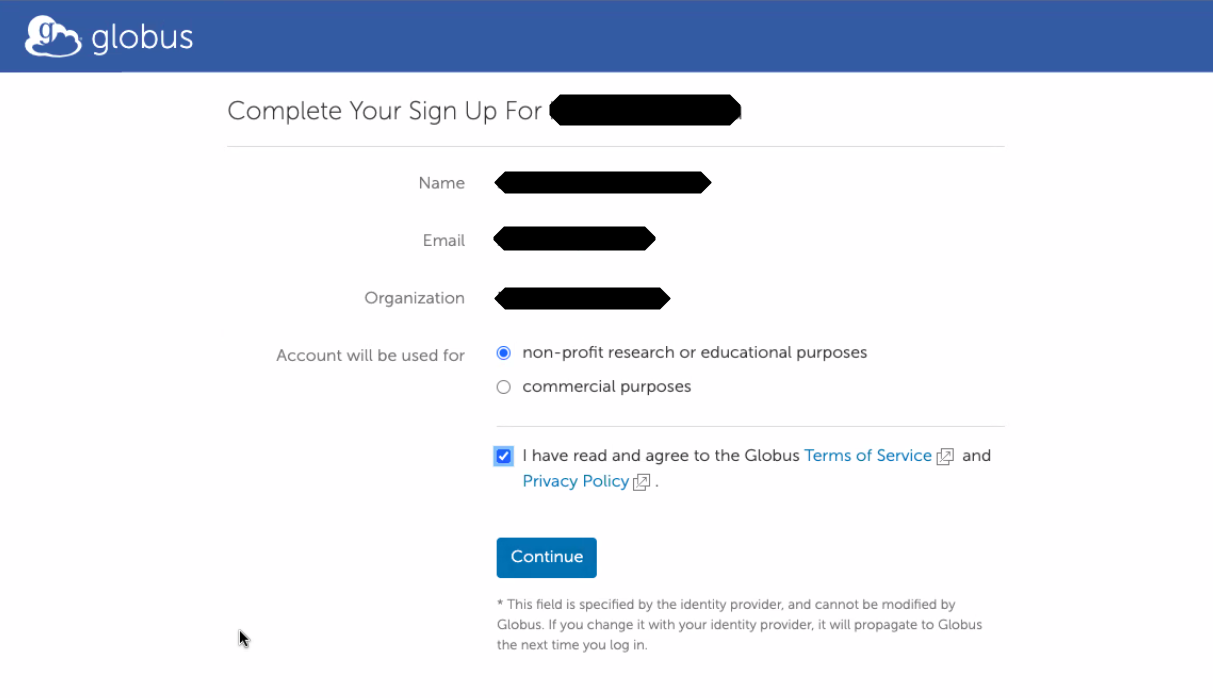
Confirm that you will use Chameleon for non-profit research or educational purposes, and agree to the Globus terms:
Allow Chameleon to get your name and email address from your university login:
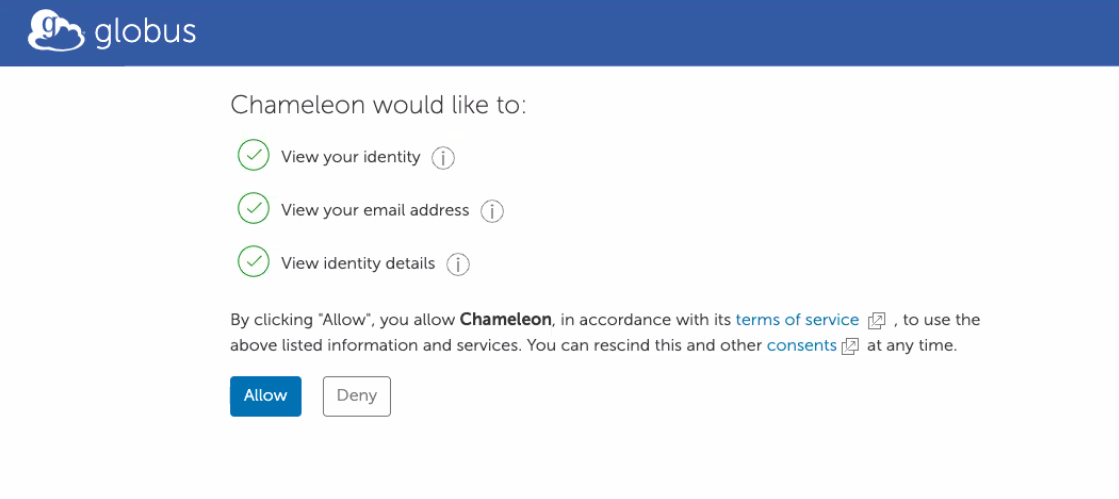
Then, read and accept the Chameleon terms of use and acceptable use policy. Also click OK to agree to acknowledge Chameleon in any publication supported by its use.
Exercise: Join a project
At this stage, you have an account on Chameleon, but your account is not yet a part of any project. To use Chameleon, you need to be a part of a project that has been approved by the Chameleon staff, under the supervision of a project lead who supervises your use of Chameleon.
If you click on the “Projects” tab in the Chameleon dashboard, you’ll see this:
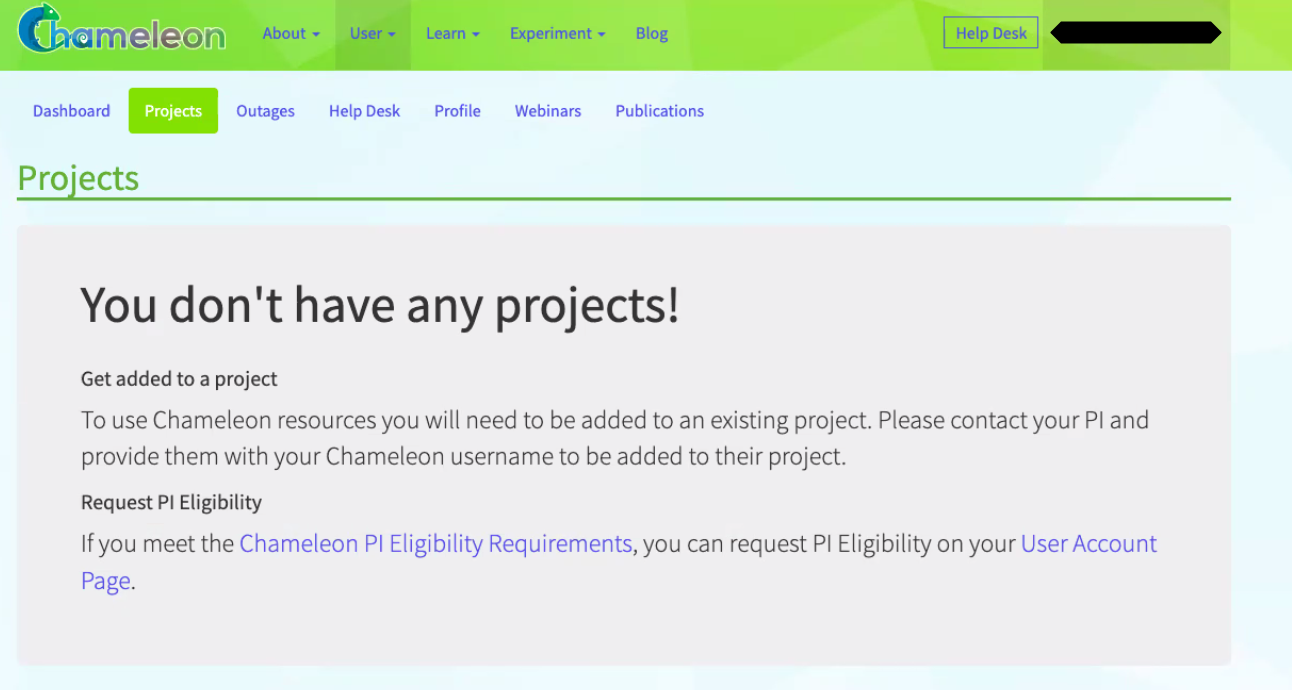
If your instructor has given you a “join link”, you can use it at this stage to request to join their project. Otherwise, tell your instructor that you have created your Chameleon account, and let them know the email address associated with your Chameleon account. Once they have added you to their project, you’ll see it listed on that page, and you can continue with the next step.
Exercise: Create SSH keys
Once you are part of a project with an active allocation, you can set up SSH keys.
Note: If you already have an SSH key pair, you can use it with Chameleon - copy the contents of the public key, then skip to the “Exercise: Upload SSH keys to Chameleon” section and continue there. If you don’t already have an SSH key pair, continue with the rest of this section.
Chameleon users access resources using public key authentication. Using SSH public-key authentication to connect to a remote system is a more secure alternative to logging in with an account password.
SSH public-key authentication uses a pair of separate keys (i.e., a key pair): one “private” key, which you keep a secret, and the other “public”. A key pair has a special property: any message that is encrypted with your private key can only be decrypted with your public key, and any message that is encrypted with your public key can only be decrypted with your private key.
This property can be exploited for authenticating login to a remote machine. First, you upload the public key to a special location on the remote machine. Then, when you want to log in to the machine:
- You use a special argument with your SSH command to let your SSH application know that you are going to use a key, and the location of your private key. If the private key is protected by a passphrase, you may be prompted to enter the passphrase (this is not a password for the remote machine, though).
- The machine you are logging in to will ask your SSH client to “prove” that it owns the (secret) private key that matches an authorized public key. To do this, the machine will send a random message to you.
- Your SSH client will encrypt the random message with the private key and send it back to the remote machine.
- The remote machine will decrypt the message with your public key. If the decrypted message matches the message it sent you, it has “proof” that you are in possession of the private key for that key pair, and will grant you access (without using an account password on the remote machine.)
(Of course, this relies on you keeping your private key a secret.)
We’re going to generate a key pair on our laptop, then upload it to the Chameleon sites we are likely to use.
Open a terminal, and generate a key named id_rsa_chameleon:
ssh-keygen -t rsa -f ~/.ssh/id_rsa_chameleon
Follow the prompts to generate and save the key pair. The output should look something like this:
$ ssh-keygen -t rsa
Generating public/private rsa key pair.
Enter file in which to save the key (/users/ffund01/.ssh/id_rsa_chameleon):
Enter passphrase (empty for no passphrase):
Enter same passphrase again:
Your identification has been saved in /users/ffund01/.ssh/id_rsa_chameleon.
Your public key has been saved in /users/ffund01/.ssh/id_rsa_chameleon.pub.
The key fingerprint is:
SHA256:z1W/psy05g1kyOTL37HzYimECvOtzYdtZcK+8jEGirA ffund01@example.com
The key's randomart image is:
+---[RSA 2048]----+
|                 |
|                 |
|           .  .  |
|          + .. . |
|    .   S .*.o  .|
|     oo. +ooB o .|
|    E .+.ooB+* = |
|        oo+.@+@.o|
|        ..o==@ =+|
+----[SHA256]-----+
If you use a passphrase, make a note of it somewhere safe! (You don’t have to use a passphrase, though - feel free to leave that empty for no passphrase.)
Then, run
cat ~/.ssh/id_rsa_chameleon.pub
to print the contents of the public key to your terminal. You will need this in the next step.
Exercise: Upload SSH keys to Chameleon
Now, we will upload this key to several of the Chameleon sites we are most likely to use: KVM@TACC, CHI@TACC, and CHI@UC. (If you later run an experiment at a Chameleon site not on this list, you’ll need to upload this key there, too.)
While logged on to the Chameleon user portal, click on Experiment > KVM@TACC.
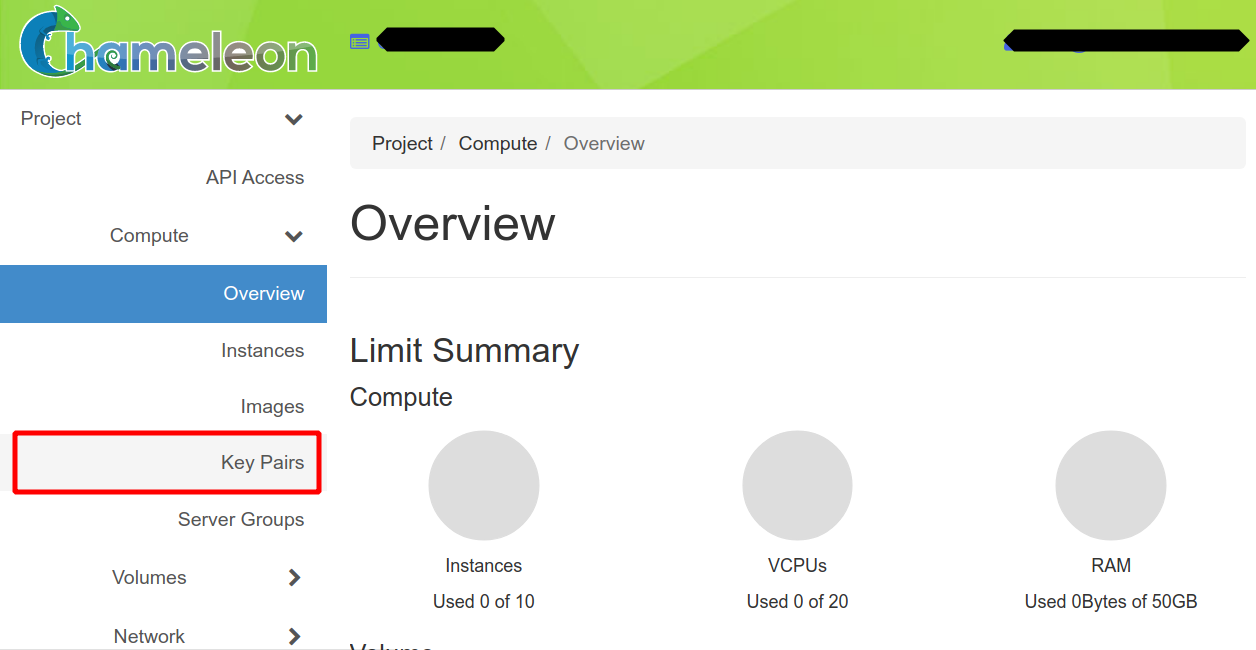
Click on the “Key Pairs” option in the Compute menu:
Then click on “Import Public Key”.
Name your key, set the key type to “SSH key”, and then paste the contents of your public key:
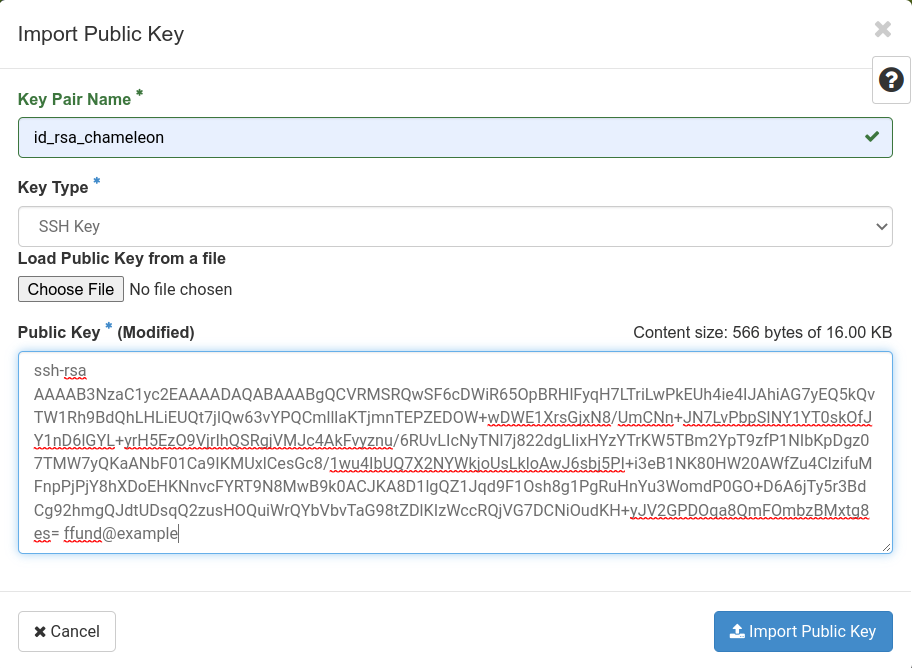
Then, click “Import Public Key” to save the key to your profile.
Return to the Chameleon user portal, click on Experiment > CHI@TACC and repeat this step there.
Return to the Chameleon user portal, click on Experiment > CHI@UC and repeat this step there, too.
Exercise: Open this notebook in Jupyter
Once you are part of a Chameleon project, you can reserve resources on Chameleon and access them over SSH! We’ll use Chameleon’s Jupyter environment for this, and we’ll open this notebook using Chameleon’s artifact sharing service, Trovi.
You can access this artifact in two ways:
- Open it directly from this link: Hello, Chameleon on Trovi
- From the Chameleon website, click on “Experiment > Trovi” in the menu. Search for “Hello, Chameleon”.
Then, click “Launch on Chameleon”. This will start a new Jupyter server for you, with the experiment materials already in it.
In the file browser on the left side, open the hello-chameleon directory and then double-click on the hello_chameleon.ipynb notebook to open it.
If you are prompted about a choice of kernel, you can accept the Python3 kernel.
Then, you can continue this tutorial by executing the cells in the notebook directly in this Jupyter environment.
Exercise: reserve resources
Whenever you run an experiment on Chameleon, you will
- Open a Python notebook, which includes commands to reserve and configure the resources (VMs, bare metal servers, or networks) that you need for your experiment. Run these commands.
- Wait until the resources in your experiment are ready to log in.
- Log in to the resources and run your experiment (either by executing commands in the notebook, or by using SSH in a terminal and running commands in those SSH sessions).
Also, when you finish an experiment and have saved all the data somewhere safe, you will delete the resources in your experiment to free them for use by other experimenters.
In this exercise, we will reserve a single virtual machine on Chameleon, and practice logging in to execute commands on this VM.
First, we will need to initialize the environment - tell it what Chameleon project to associate our experiment with.
You should already be a part of a Chameleon project, which has a project ID in the form “CHI-XXXXX”. If you don’t know your project ID, you can find it by logging in to the Chameleon web portal, and checking your dashboard. When you run the next cell, you will see a drop-down menu for selecting your project.
We will also indicate which Chameleon site we want to use. Since this experiment uses a virtual machine, the site will be KVM@TACC - the only Chameleon site that supports VMs.
import chi, os, time, datetime
from chi import lease
from chi import server
from chi import context
from chi import hardware
from chi import network

context.version = "1.0"
context.choose_project()
context.choose_site(default="KVM@TACC")
username = os.getenv('USER') # all exp resources will have this suffix
Next, we’ll give our resource a name. Every resource in a project should have a unique name, so we will include a username, as well as a description of the experiment, in the name.
exp_name = "hello_chameleon"
server_name = f"{exp_name}-{username}"
lease_name = f"{exp_name}-{username}"
Now we are ready to ask Chameleon to allocate a resource to us! For a VM, we specify the “flavor” or size of the resource (in terms of CPU, memory, and storage) and the operating system image that we want to have pre-installed.
First we will reserve the VM instance for 6 hours, starting now:
l = lease.Lease(lease_name, duration=datetime.timedelta(hours=6))
l.add_flavor_reservation(id=chi.server.get_flavor_id("m1.small"), amount=1)
l.submit(idempotent=True)
l.show()
then we can launch it:
image_name = "CC-Ubuntu24.04"
s = server.Server(
    name=server_name,
    image_name=image_name,
    flavor_name=l.get_reserved_flavors()[0].name
)
s.submit(idempotent=True)
Once the resource is allocated and ready, we will associate a network address to it, so that we can log in to the resource over the Internet using the SSH protocol.
s.associate_floating_ip()
reserved_fip = s.get_floating_ip()
print(reserved_fip)
There’s one more step before we can log in to the resource - by default, all connections to VM resources are blocked, as a security measure. We will need to add a “security group” that permits SSH connections to our project (if it does not already exist), then attach this security group to our VM resource.
sg_list = network.list_security_groups(name_filter="allow-ssh")
if sg_list: # allow-ssh already exists
    sg = sg_list[0]
else:       # create allow-ssh
    sg = network.SecurityGroup({"name": "allow-ssh", "description": "Enable SSH traffic on TCP port 22"})
    sg.add_rule("ingress", "tcp", 22)
    sg.submit()
s.add_security_group(sg.id)
That’s all we need to do to prepare a resource to log in! Run the following cell - when it returns, it means that the VM resource is ready for you to log in.
s.check_connectivity()
Exercise: log in to resources and execute commands
In this exercise, we’ll practice running commands on the VM resource in three ways:
- by opening an SSH session in the terminal inside this Jupyter environment, and running commands in that session,
- by opening an SSH session in a local terminal and running commands in that session.
- by using the
python-chiPython interface to execute commands from within this Python notebook.
Log in over SSH from Jupyter environment
One of the easiest ways to log in to your VM is to open a shell inside the Jupyter environment, and log in over SSH from that shell.
In the Chameleon JupyterHub environment, click File > New > Terminal. This will open another tab in the Jupyter environment, with a shell session.
Now, run this cell to get the SSH login command. Copy the output of the cell:
print(f"ssh cc@{reserved_fip}")
then switch to your terminal shell tab, paste the SSH login command, and hit Enter.
The first time you log in to each new host, you may see a warning similar to the following:
The authenticity of host "129.114.26.xx (129.114.26.xx)" cannot be established.
ED25519 key fingerprint is SHA256:1fcbGrgLDdOeorauhz3CTyhmFqOHsrEWlu0TZ6yGoDM.
This key is not known by any other names
Are you sure you want to continue connecting (yes/no/[fingerprint])?
and you will have to type the word yes and hit Enter to continue.
Then, you’ll be logged in! To validate that you are logged in to the remote host, and not running commands directly in the Jupyter shell environment, run
hostname
and verify that the output starts with “hello-chameleon”. (This is the hostname we assigned to our VM resource!)
Log in over SSH from local terminal
To log in to the VM over SSH from your local terminal, you will follow a similar process:
- open the terminal application installed on your computer,
- run the cell below, which will print an SSH login command,
- copy this command and make any necessary modifications (if needed, as described in the following cell),
- paste it into your terminal and hit Enter.
In this case, you will specify the key location as part of the SSH command. These instructions assume that, as described in the previous steps, you have created a key pair named id_rsa_chameleon, put it in the default .ssh subdirectory in your home directory, and uploaded it to the KVM@TACC web interface.
print(f"ssh -i ~/.ssh/id_rsa_chameleon cc@{reserved_fip}")
If your Chameleon key is in a different location, or has a different name, then you may need to modify the ~/.ssh/id_rsa_chameleon part of this command to point to your key.
The first time you log in to each new host, your computer may display a warning similar to the following:
The authenticity of host "129.114.26.xx (129.114.26.xx)" cannot be established.
ED25519 key fingerprint is SHA256:1fcbGrgLDdOeorauhz3CTyhmFqOHsrEWlu0TZ6yGoDM.
This key is not known by any other names
Are you sure you want to continue connecting (yes/no/[fingerprint])?
and you will have to type the word yes and hit Enter to continue.
If you have specified your key path and other details correctly, it won’t ask you for a password when you log in to the resource. (It may ask for the passphrase for your private key if you’ve set one.)
Let’s practice running a command in this remote session. Copy and paste the following command into the SSH terminal, to create a file and populate it with a “hello” message:
echo "Hello from $(hostname)" > hello.txt
then check the file contents:
cat hello.txt
Now we will use this file “hello.txt” in a later exercise, when we want to practice transferring files between the remote host and our own laptop!
Using python-chi to execute commands on the remote host
Finally, it’s useful to know that we can also execute commands over SSH on the remote instance, directly from a Python notebook! The following cell shows an example, where we run the hostname command using the python-chi library:
s.execute(f"hostname")
Exercise: transfer files to and from resources
While working on a remote host, we will often want to transfer files from the remote host to our local filesystem, or vice versa.
To move data back and forth between a terminal and a remote system that you access with ssh, we can use scp. The syntax is:
scp [OPTIONS] SOURCE DESTINATION
where SOURCE is the full address of the location where the file is currently llocated, and DESTINATION is the address of the location that you want to copy a file to.
Transfering files through the local terminal
We previously generated a file on the remote VM, “hello.txt”. Now, we’ll use scp to transfer the file from the remote host to our laptop, make a change to it, then transfer it back.
You will run the scp command from your local terminal, not on the remote host. If you are still logged in over SSH to the remote host, type
exit
to return to your local terminal. Check the terminal prompt and make sure it reflects that you are executing commands at your local terminal, and not on the Chameleon VM.
Then, we’ll need to generate an scp command to run, including:
- the location of the key you use to SSH into the remote host, e.g.
~/.ssh/id_rsa_chameleon - the username you use to SSH into the remote host,
ccin this case - the IP address or hostname you use to SSH into the remote host
- the location of the file you want to copy on the remote host, which is
/home/cc/hello.txt - and the location on your laptop to which you want to copy the file. We will copy it to the same location from which you run the scp command (
.is shorthand for “my current working directory”),
Run the cell below, to generate the scp command:
print(f'scp -i ~/.ssh/id_rsa_chameleon cc@{reserved_fip}:/home/cc/hello.txt .')
Copy the command that is printed by the cell above, and make any changes if necessary (e.g. to the key location or name, or to the location in your local filesystem to which the file should be transferred). Then, execute it in your local shell. (Note that the . at the end is part of the command - don’t omit this part!)
The output of this command should show that the file is transferred to your local filesystem:
hello.txt 100% 1KB 0.1KB/s 00:00
When you have successfully transferred “hello.txt” from the remote host to your laptop, locate it in your local filesystem and open it in your preferred text editor. Make a change (any change!) to the file and save it.
Then, we’ll transfer it back to the remote host! To transfer it back to the remote host, the SOURCE argument will become the location of the file in the local filesystem, and the DESTINATION will become the location to which the file should be transferred on the remote VM.
Use the cell below to generate the scp command to transfer the file to the remote host:
print(f'scp -i ~/.ssh/id_rsa_chameleon hello.txt cc@{reserved_fip}:/home/cc/')
Copy the command that is printed by the cell above, and make any changes (e.g. to the key location or name, or to the location in your local filesystem from which the file should be transferred). Then, execute the command in your local shell.
The output of this command should show that the file is transferred to the remote filesystem:
hello.txt 100% 1KB 0.1KB/s 00:00
To validate that the changes you made locally are now reflected in the version of the file that is on the remote host, use the SSH command from the previous section to log in to the remote host again, and run
cat hello.txt
in the SSH session. Verify that your changes appear in the output.
Exercise: Hello, Linux
If you are not very comfortable working at the Linux terminal, then before you delete your virtual machine, you can take the opportunity to learn a few basic commands, following the instructions in: Hello, Linux
Exercise: delete resources
Chameleon is a shared facility, and it is important to be mindful of your resource usage and to “free” resources for use by other experimenters when you are finished with them. Your resource will be deleted automatically at the end of your lease, but if you finish sooner, you should delete the compute instance and the lease.
In the cell below, uncomment both lines of code, then run the cell to free
- the VM and the network address you attached to it.
- and the reservation.
Note that removing the resources will revoke your access to them, and all the information stored on them will be erased. Therefore, ensure that you have saved all your work before deleting the resources.
# s.delete()
# l.delete()
Alternatively, you can delete your instance using the GUI:
- From the Chameleon website, click on “Experiment > KVM@TACC” in the menu (since that is the site that our instance is on).
- Select “Instances” from the menu on the left side.
- Find your instance in the list. If the project that you are part of has many instances, you can filter by name to make it easier to find yours: change the filter criteria to “Instance Name”, put part of your instance name in the text input field, and click “Filter”.
- Check the box next to your instance (make sure not to select someone else’s!)
- and press the red “Delete Instances” button.
and you can similarly delete a lease using the GUI:
- Select “Leases” from the menu on the left side.
- Find your lease in the list.
- Check the box next to your lease (make sure not to select someone else’s!)
- and press the red “Delete Lease” button.
Last updated: August 2025, to add a reservation step now that KVM@TACC requires it.
Questions about this material? Contact Fraida Fund
This material is based upon work supported by the National Science Foundation under Grant No. 2231984 and Grant No. 2230079. Any opinions, findings, and conclusions or recommendations expressed in this material are those of the author(s) and do not necessarily reflect the views of the National Science Foundation.